 Playable Books
Mayank Sanganeria · section 3 of 12
Chapter 2 — Arrival Points
Read and hear this section in the playable edition →In 4/4 swing, beats 1 and 3 are the structural arrivals. The hi-hat and ride accent 2 and 4, but lines resolve on the half-note pulse. Hear every bar as two halves, each ending in a landing.
That sounds like a contradiction, since jazz is famous for its backbeat. It isn't one. The backbeat is the drummer's push; the arrivals are where the line receives that push. A melody that lands on 2 and 4 fights the rhythm section for the same space. A melody that lands on 1 and 3 interlocks with it. Chapter 8 develops this. For now, count in halves.
The target hierarchy
Not all arrivals weigh the same. Rank them before you play.
Treat Levels 1 and 2 as firm rules for the first few months. Level 3 relaxes once cells and runways enter (Chapters 4–6). A cell that starts on beat 4 often puts a non-chord tone there, and that's fine: beat 4 is passing through on the way to beat 1. Level 4 is free. Its only job is to push the line into the next arrival.
The 3rd and 7th get priority at Level 1 because they define the chord. Land the root on a change and you've doubled the bass player. Land the 5th and you've played a note shared by half the chords in the key. Land the 3rd or 7th and you've told the listener exactly which chord just arrived. You'll still land on roots and 5ths, especially on the I chord, but treat them as the exception.
Think backward
Galper's most practical instruction, restated as a procedure:
1. Name the target note.
2. Name the beat it lands on.
3. Count the eighth-note slots available before it.
4. Fill those slots with a figure of exactly that length.
The line is composed right to left and played left to right. Ex. 2.1 shows the process as four passes over the same two bars. Each staff keeps everything from the one above it and adds a layer, working backward from the target.
Ex. 2.1 — Composing backward. First the target (E on beat 1 of Cmaj7), then a half-bar arrival (B, the 3rd of G7), then a three-note cell between them, then a runway from the bar line.
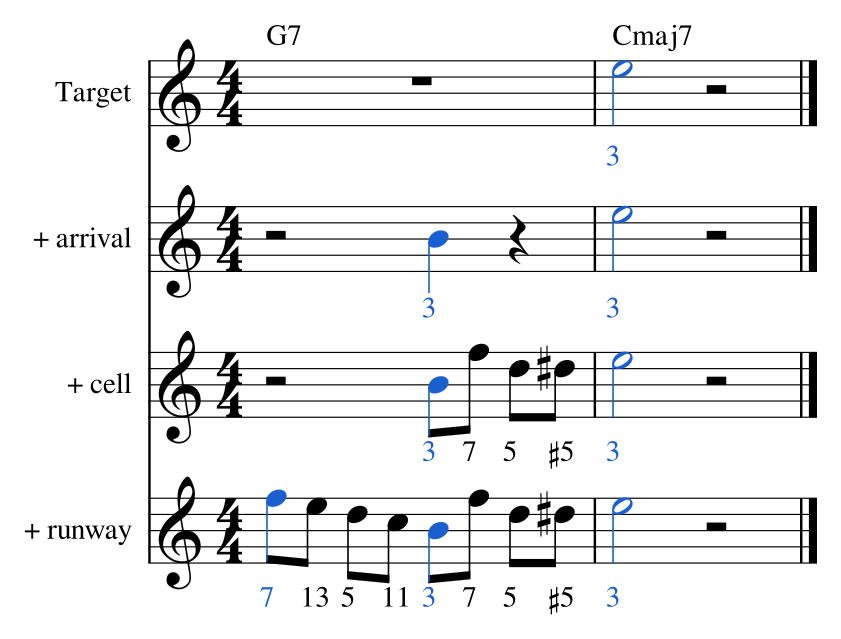
Notice what never moves as the line fills in: E on beat 1 of bar 2, and B on beat 3 of bar 1. The arrivals are decided first, and everything else is built to deliver them. In the last pass, the runway F–E–D–C exists only to bring the line down to B on time. The cell F–D–D♯ exists only to bring B up to E.
With practice, the four steps collapse into a single act of hearing. You'll hear "E on the next downbeat" and your fingers will pick the approach. Until then, do it deliberately and slowly.
The slot budget
Take any tune. Mark every Level 1 and Level 2 arrival, then count the eighth-note slots between consecutive arrivals. That number is your slot budget: the most elaboration that fits before the next landing.
A chord that lasts a whole bar gives you 3 + 3: an arrival on beat 1, three slots, an arrival on beat 3, three slots. Skip the beat-3 arrival and you get 7. Two chords per bar give you 3 and 3 with no option to skip, because both beats are change arrivals. That one number explains a lot about how a tune feels to improvise on (Chapter 9).
Colored arrivals
Once the hierarchy is automatic, you can land a tension on a Level 1 or 2 point: the 9 on a major or minor 7th chord, ♭9 or ♯9 on a dominant, ♯11 on a major 7th. A colored arrival has one rule: it resolves by step on the next arrival. Treat it as a skeleton tone that arrives late, not as a replacement for one.
Ex. 2.2 — D, the 9th of Cmaj7, lands on beat 1 and resolves up to E, the 3rd, on beat 3. The enclosure E–C♯ aims at D as if it were the real target.
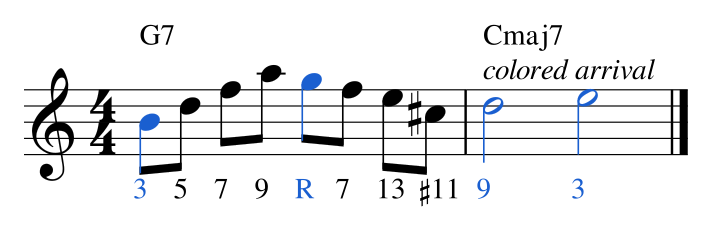
The ear expects the 3rd on beat 1, gets the 9th, and hears it resolve two beats later. It's the jazz cousin of the classical appoggiatura, and it works for the same reason: the arrival still happens, half a bar late.